To create a funnel in GoHighLevel, build your lead-capture form first under Sites → Forms, then go to Sites → Funnels, start from a template, drop your form onto the landing page, set its redirect to the next step, add a thank-you page, and publish. Below is the full flow with screenshots from a live sub-account.
IN THIS GUIDE
What you’ll build
A simple lead-generation funnel: a landing page with a form that captures a visitor’s details, a redirect that sends them to a thank-you page once they submit, and contacts that drop straight into your GoHighLevel CRM automatically. The trick that trips most people up is that the form is built separately from the funnel, then connected — so that’s where we’ll start.
Before you start
You need a GoHighLevel account and access to a sub-account (the location where your funnel will live). If you’re still testing the platform, you can build and publish a full funnel on the free trial — start the GoHighLevel 30-day free trial (30 days instead of the usual 14), or go straight to signup. Everything below happens inside a single sub-account.
Step 1 — Build your lead-capture form first
The form is what captures your leads, and you build it before the funnel so it’s ready to drop in later. In your sub-account, scroll down the left menu to Sites, then open the Forms tab at the top and click Create form.

The form builder is drag and drop. Pull fields onto the canvas, and double-click any field to open its settings or remove it. To make a field mandatory, open its settings and toggle Required — a star appears next to it so visitors can’t submit without filling it in.
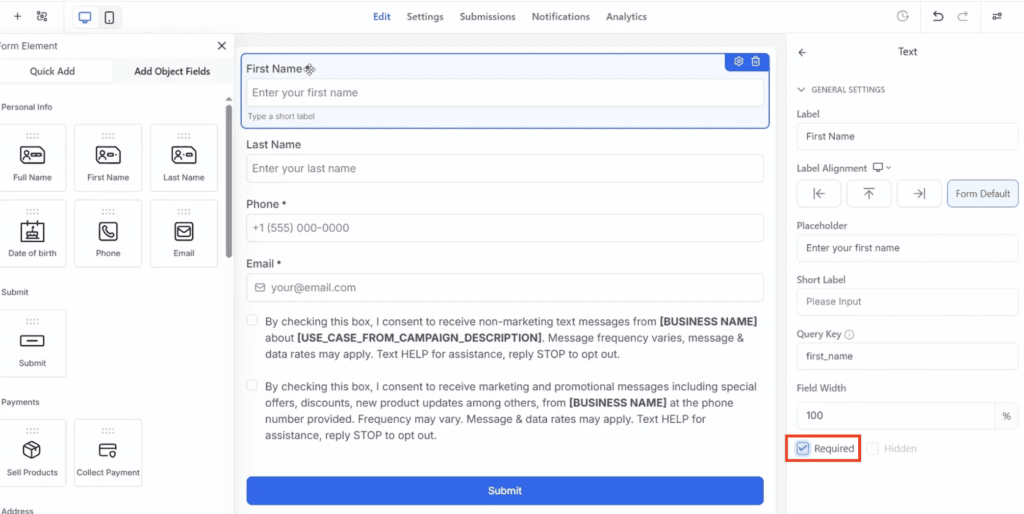
For a basic lead form, first name, last name, and email are plenty — keep the phone number optional so you don’t scare people off. You can drag in extra fields like city, dropdowns, or a terms-of-service checkbox from the left if you need them. When you’re happy, rename the form at the top to something you’ll recognise later (you’ll pick it from a list when you connect it), and click Save.
Step 2 — Create the funnel from a template
Back in Sites, switch to the Funnels tab (not Websites) and click New funnel. You get three ways to start: a blank canvas, build with AI from a prompt, or start from a template. For your first funnel, go with a template — the layout and copy structure are already built, so you only have to customise.
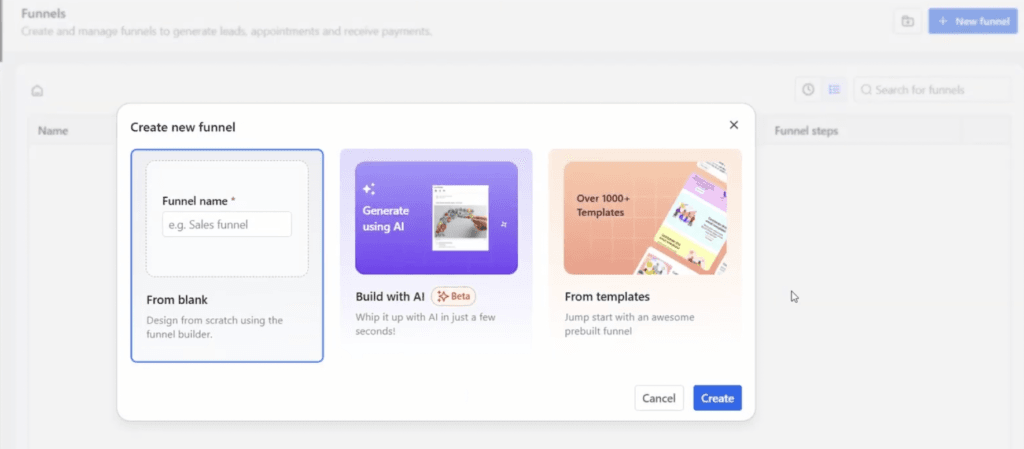
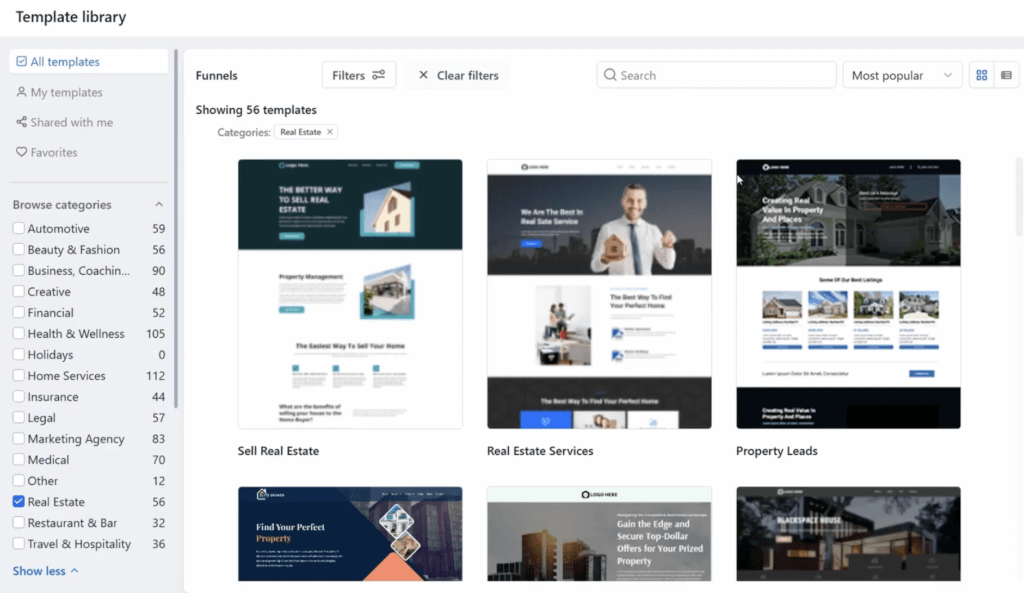
Choose From templates and click Continue. On the left you can browse by category — legal, marketing, agency, medical, real estate, and more — and each category holds plenty of layouts. Preview any template and scroll through it before committing. When one fits your offer, click Choose template and give it a moment to set up.
Step 3 — Edit the landing page
Your template opens in the drag-and-drop editor. GoHighLevel colour-codes what you’re hovering: green is a whole section, and orange is an individual element like a block of text. Double-click any text to rewrite it, and click a section or element to open its options on the right — that’s where you change the background image or colour, padding, and so on.
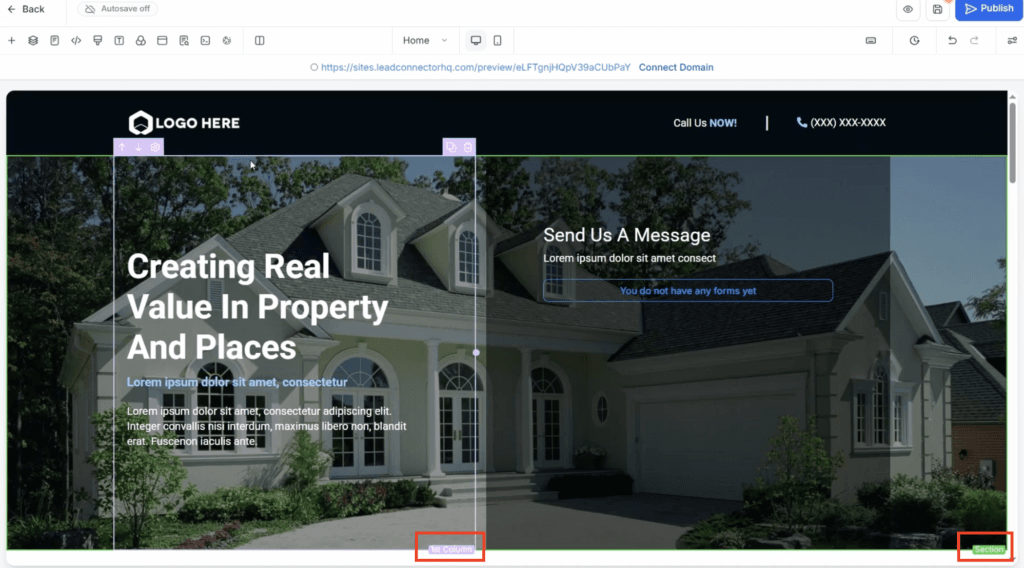
To add something new, click Add elements in the top-left and drag in buttons, text, bullet lists, and more. To remove a block you don’t want, hover over it and hit the delete icon. Work through the page and make every element say what you want.
Step 4 — Add your form and set the redirect
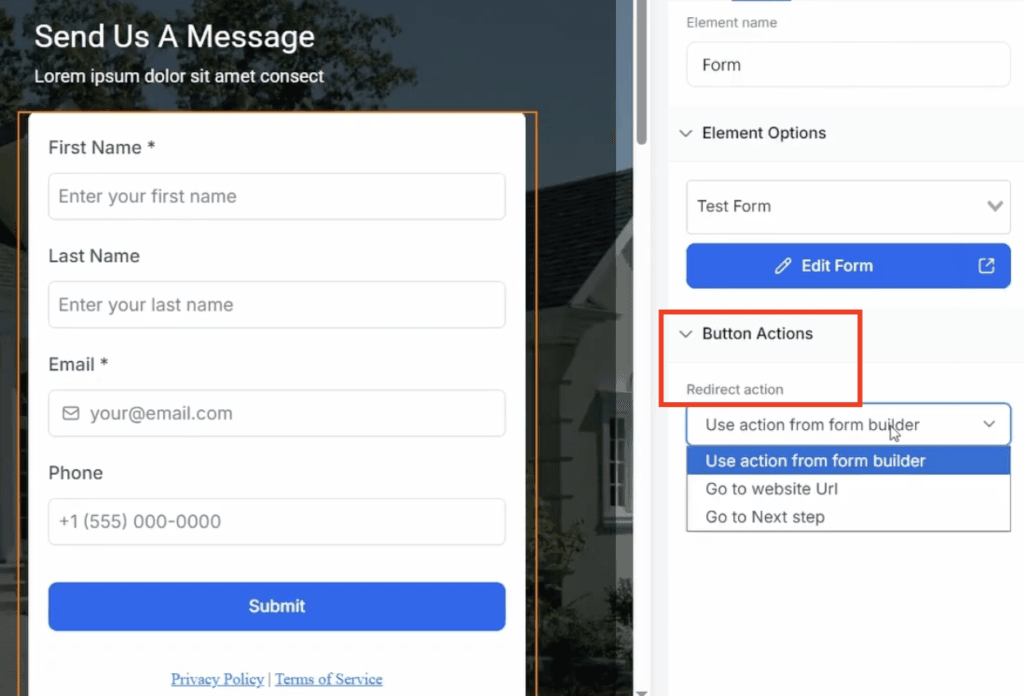
This is the part that actually makes the funnel work. Some templates already include a form element; if yours does, click it and swap in the form you built. If it doesn’t, click the plus icon in the top-left, choose Forms and surveys, then Add existing form, and drag it where you want it. Click the form and pick your saved form from the list.
Now set the redirect action on the form to go to the next step. That’s what sends anyone who submits straight to your thank-you page — and GoHighLevel adds them to your contacts automatically at the same time.
Step 5 — Build the thank-you page
Save your landing page first (top-right) — switching pages before saving is the easiest way to lose your work. Then click the page name at the top of the editor and select Thank you to open that step. Customise it to your brand and message the same way you did the landing page: rewrite the text, adjust the design, and save again when you’re done.
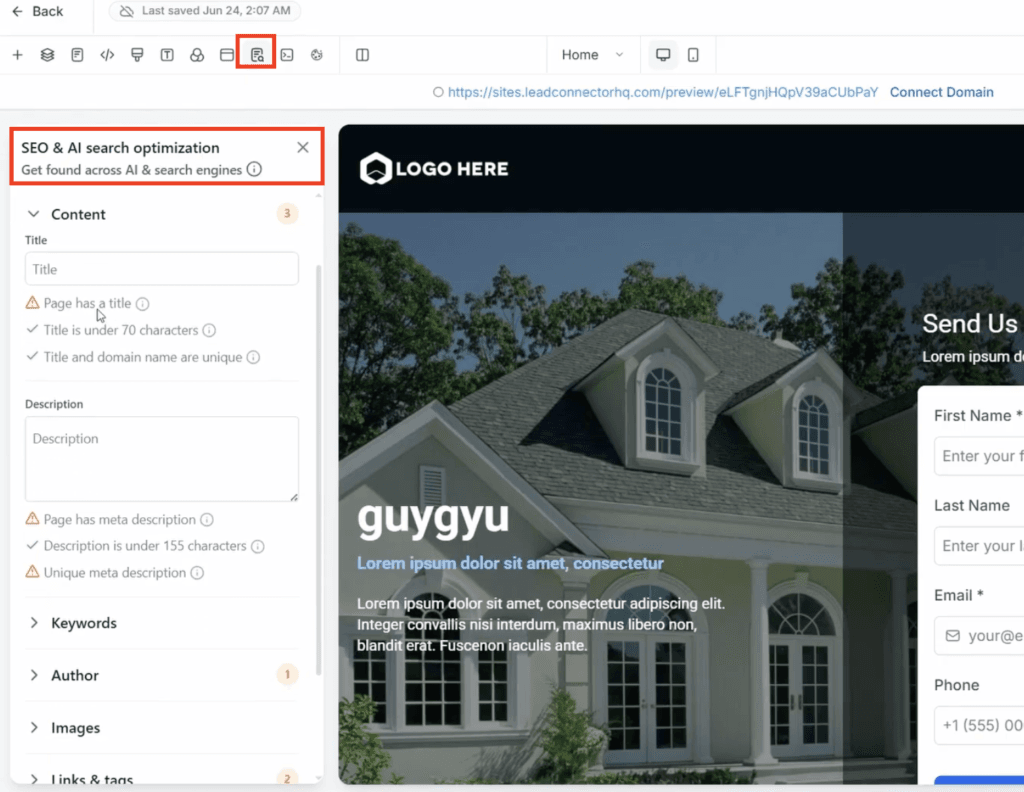
Step 6 — Add SEO titles, then publish
One step most funnel tutorials skip: before you publish, open SEO and AI search optimization at the top, go to Content, and add a proper page title and description. This is what search engines show, so it’s worth doing — and do it for both the home page and the thank-you page. Once your titles are in, click Publish and your funnel is live.
Common mistakes and troubleshooting
- Switching pages before saving. Save (top-right) every time before you jump between the home and thank-you steps, or you’ll lose edits.
- The form isn’t connected. If submissions go nowhere, check the form’s redirect is set to “go to next step” and that you selected your saved form, not a blank one.
- Starting from blank on your first try. A blank canvas means building every element by hand. Start from a template until you know the editor.
- Forgetting the thank-you page SEO. Set the title and description on both pages, not just the home page.
- Default URL vs custom domain. The funnel publishes on a GoHighLevel URL out of the box. Connecting your own domain (Settings → Domains) is a separate, optional step for a more professional link.
The part most funnel tutorials skip
I built this one the same way you see in the video, starting from a template instead of a blank page. The form part is what I’d tell beginners to do first. I set it up under Sites then Forms, made first name, last name and email required, left phone optional, and saved it before touching the funnel. Doing it in that order meant it was just sitting there ready when I needed it.
The template editor is easy once you get the color coding. Green is a whole section, orange is a single element, and clicking either opens its settings on the right. I spent most of my time just rewriting the dummy text and swapping a background.
The step that actually matters is in screenshot 6. After dropping the form onto the page, you have to set the redirect to go to the next step. Miss that and the form looks fine but leads go nowhere. That one setting is the whole point of the funnel.
What surprised me was how easy it is to lose work by switching to the thank you page without saving first. So save often. If I were starting over, I’d use a template, build the form before the funnel, and double check that redirect before publishing.
Start the GoHighLevel 30-day trial
Build your first funnel on the extended 30-day trial — 30 days instead of the usual 14, plus the bonus vault.
Template, AI, or blank — what I’d actually use
For your first few funnels, start from a template. The structure, spacing, and form placement are already done, so you spend your time on the copy and offer instead of fighting the editor. The AI builder is genuinely useful once you know what a good funnel looks like — describe what you want and it drafts the pages — but on day one it’s easy to accept something that doesn’t convert. Save the blank canvas for when you have a specific layout in your head and the editor feels natural. Whichever you pick, the part that matters is the same: connect the form and set the redirect, or the prettiest funnel in the world still won’t capture a single lead.
Frequently asked questions
Do I need to build a form before creating a funnel in GoHighLevel?
It’s the easiest order. Build your lead-capture form first under Sites then Forms, save it, then create the funnel and drop that saved form onto your landing page. You can build the form afterwards too, but doing it first means it’s ready to connect.
Can I build a GoHighLevel funnel with AI instead of a template?
Yes. When you create a new funnel you get three options: start from a blank canvas, build with AI from a prompt, or start from a template. For a first build, a template is the safest because the layout and structure are already done.
Do I need a custom domain to publish a GoHighLevel funnel?
No. You can publish on the default GoHighLevel URL straight away. Connecting your own domain under Settings then Domains is a later step that makes the funnel look more professional, but it isn’t required to go live.
Where do funnel leads go after someone submits the form?
Anyone who submits the form is added to your contacts automatically, and the redirect you set sends them to the next step, usually the thank-you page. From there you can track them in a pipeline and trigger follow-up automations.
Can I create a funnel on the GoHighLevel free trial?
Yes. The funnel builder, form builder, and publishing are all available during the free trial, so you can build and launch a full funnel before paying for a month.
Ready to build yours?
Get your funnel live, then let GoHighLevel follow up with every lead automatically.
Related next step
Next: once leads start coming in, track those leads in a pipeline, explore more GoHighLevel guides, or browse the tools I actually use.