Setting up pipelines and opportunities in GoHighLevel takes about two minutes: open Opportunities → Pipelines, create a pipeline, name your stages, then add opportunities (your deals) and drag them from stage to stage as they progress. Below is the full flow, with screenshots from a live sub-account.
IN THIS GUIDE
Before you start
You need a GoHighLevel account and access to a sub-account (also called a location). Pipelines live inside a sub-account, not at the agency level, so make sure you’re in the right one before you begin. If you’re still testing the platform, you can do all of this on the free trial — start the GoHighLevel 30-day free trial (30 days instead of the usual 14), or go straight to signup.
One heads-up: GoHighLevel is rolling out a refreshed Pipelines design you can switch on under Sub-account → Labs. If your screen looks a little different from the screenshots, that’s why — the steps are the same either way.
Pipelines vs opportunities in GoHighLevel
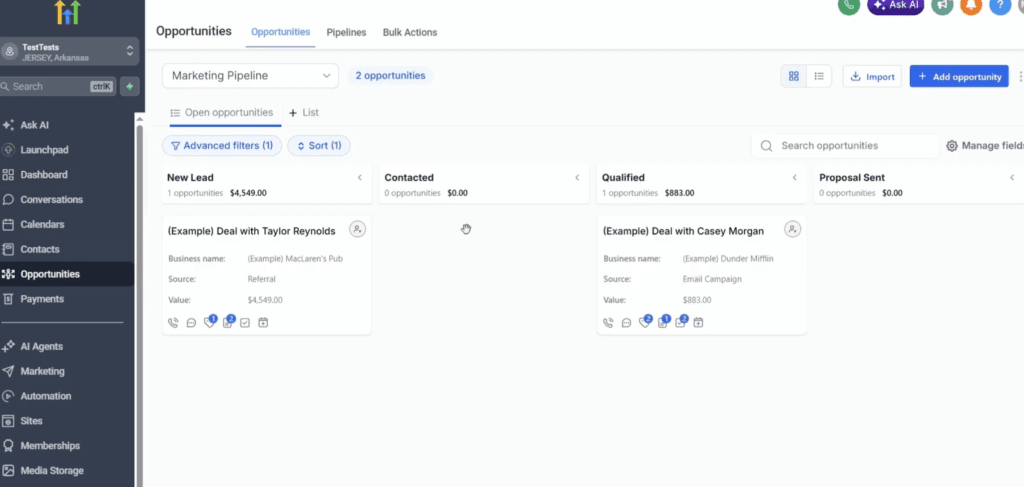
These two words get mixed up constantly, so here’s the simple version. A pipeline is the visual board — a row of stages a deal moves through, like New Lead, Booking Requested, Proposal Sent, and Closed. An opportunity is one deal sitting on that board, tied to a contact and carrying its own value, stage, and owner. You move opportunities left to right as they progress.
You can build as many pipelines and stages as you want inside a single sub-account, which is handy once you run more than one kind of process (sales in one, onboarding in another).
How to create a pipeline in GoHighLevel
Log into your sub-account and click Opportunities in the left panel. This is where every pipeline and deal lives.
From there, building the pipeline takes a handful of clicks:
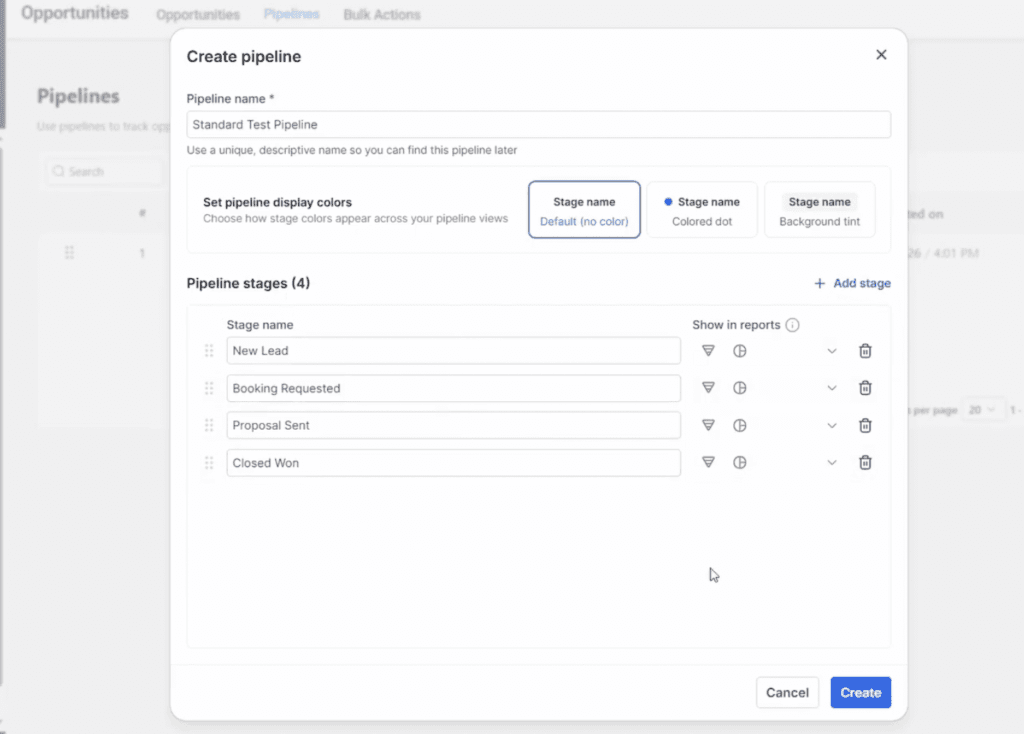
- Click Pipelines at the top, then Create Pipeline in the top-right corner.
- Give it a clear, specific name. You’ll filter by pipeline name later, so “Sales – Main” beats “Pipeline 1”.
- Pick a stage colour if you want one, or leave it off — it’s purely visual.
- Build your stages. The defaults are New Lead, Contacted, Proposal Sent, and Closed. Rename them to match how you actually work, and add more if you need them.
- Click Create at the bottom right.
You don’t have to create Won or Lost stages — GoHighLevel handles those outcomes for every pipeline automatically. Keep your custom stages action-based (“Booking Requested”, “Proposal Sent”) and resist the urge to add ten of them.
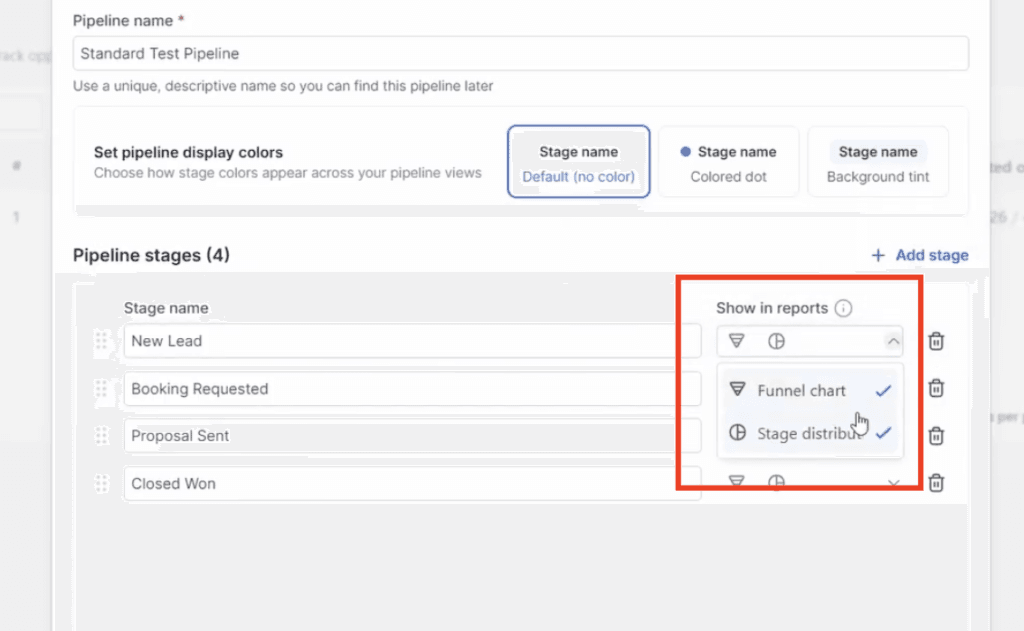
Here’s the setting most tutorials skip: next to each stage there are toggles that control whether it appears in your dashboard funnel and pie charts. Turn a stage off and it drops out of those reports; turn every stage off and the whole pipeline disappears from the dashboard. Worth a quick check so your reporting shows what you actually want.
How to add opportunities to your pipeline
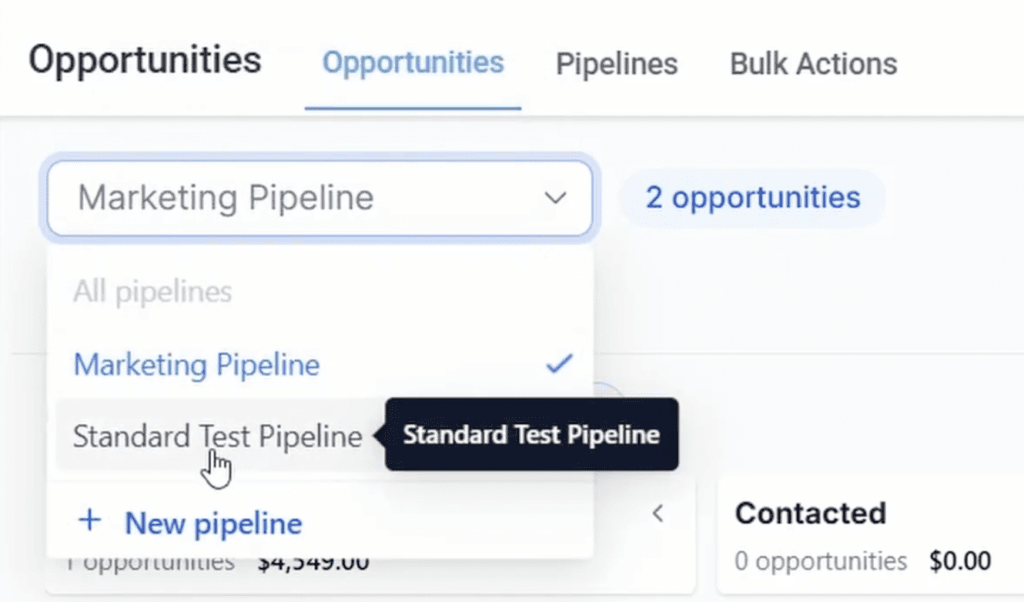
Go back to Opportunities at the top and use the dropdown in the top-right to pick the pipeline you just made. A brand-new pipeline starts empty — that’s expected.
- Click Add Opportunity in the top-right corner.
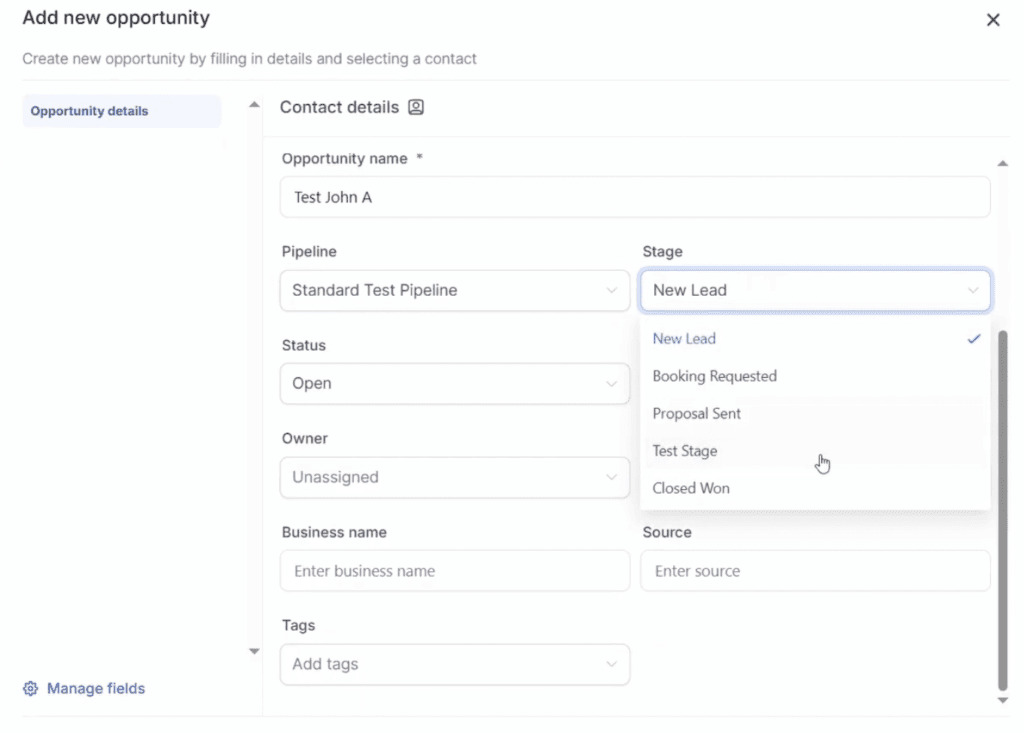
- Fill in the contact details — name, email, phone. Anything with a star is required; the rest is optional.
- Scroll to the opportunity name and options. Pick the pipeline, choose the starting stage, set the status to Open, and enter the deal value.
- Optionally add an owner (the person responsible), followers (CC’d team members), the business name, the source, and tags — tags make filtering far easier later.
- Click Create.
Tracking value and moving deals through stages
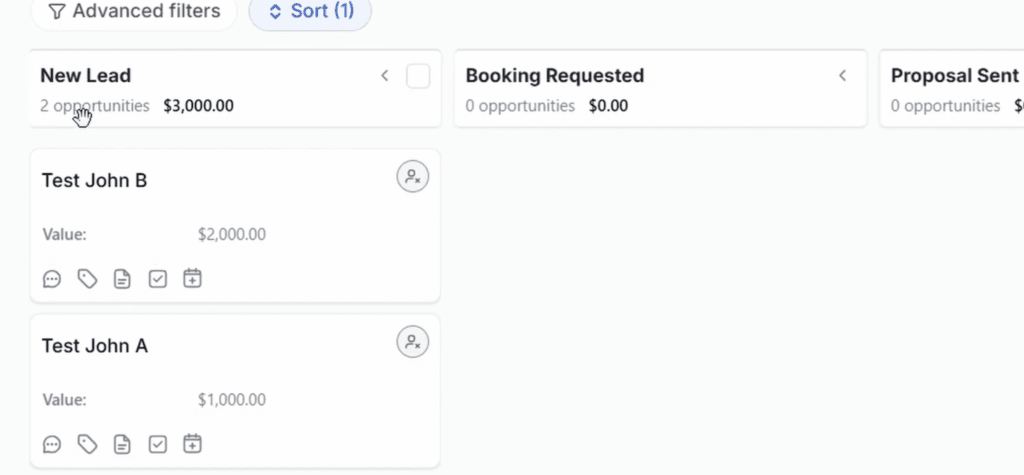
This is where pipelines earn their keep. Each stage shows a running total of the opportunity values inside it. Drop a $1,000 deal and a $2,000 deal into New Lead and the column header reads $3,000 — GoHighLevel adds it up for you, so you can see the potential value sitting in every stage at a glance.
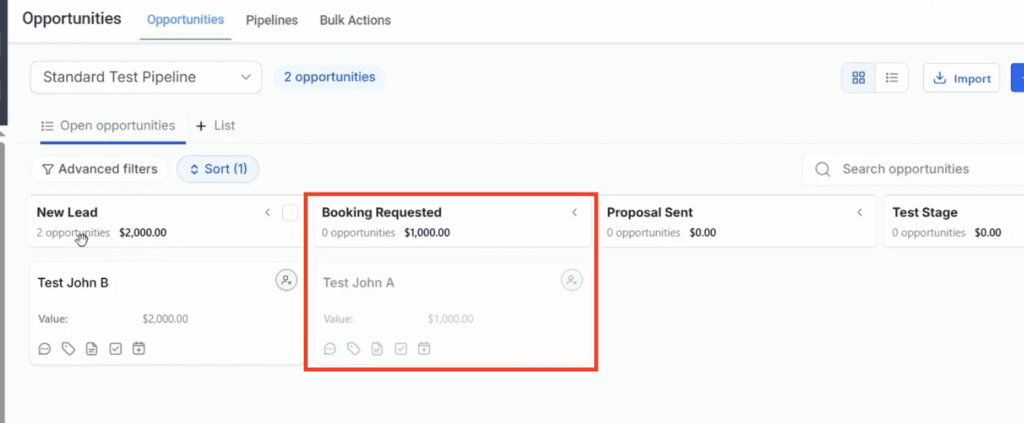
To move a deal forward, drag its card into the next stage. The stage totals recalculate the instant the card lands, and any automations tied to that stage change can fire automatically. It can lag for a second or two — give it a moment and refresh if it looks stuck.
Click any card to open it and you can add tasks, notes, appointments, tags, and conversation history, plus see the assigned owner’s profile. Keeping notes current here means the whole story of a deal lives in one place instead of in your head — especially useful after a phone call.
Common mistakes and troubleshooting
- Too many stages. A board with ten micro-stages slows everyone down. Stick to the steps that genuinely change what happens next.
- Skipping the value. Leave the deal value blank and your stage totals and forecasts are meaningless. Always set a number, even an estimate.
- Wrong sub-account. Pipelines are per sub-account. If you can’t find the one you built, check you’re in the right location.
- The layout looks different. You (or a client) may have the new HighRise Pipelines experience switched on under Labs. Same steps, lightly different layout.
- A card seems stuck after dragging. It’s usually just a brief lag — wait a second, then refresh.
What I found setting up pipelines in GoHighLevel
I set this up the same way you’ll see in the video, starting from a fresh sub-account. Getting to the pipeline builder is easy, it’s all under the Opportunities tab, and creating one took me less than a minute. I renamed the default stages so they matched how I actually work (I swapped Contacted for Booking Requested) and added one extra stage just to test it. Nothing here is complicated.
The bit that stood out to me was the value tracking. Once I dropped in two opportunities, one at 1,000 and one at 2,000, GoHighLevel added them up on its own and showed 3,000 sitting at the top of the New Lead column. You can see that in screenshot 6. It sounds small, but seeing the potential value per stage at a glance is the thing that makes the board actually useful instead of just pretty.
The one rough spot is the drag and drop. Moving a card to the next stage works, but it lagged for a second or two for me, so don’t panic if it looks stuck.
If you’re new, name your pipeline something specific and always fill in the value. Skip the value and those stage totals are useless.
Start the GoHighLevel 30-day trial
Build your first pipeline on the extended 30-day trial — 30 days instead of the usual 14, plus the bonus vault.
One pipeline or several? What I’d actually do
Start with one simple pipeline of four or five stages and use it until you have real deal volume. Only add a second pipeline when you have a genuinely different process — sales in one, client onboarding or fulfilment in another — rather than splitting hairs over stages. If you’re an agency managing multiple clients, keep one pipeline per client inside their own sub-account instead of cramming everyone onto one board. Clean stages plus an honest deal value on every card is what makes the dashboard numbers worth trusting.
Frequently asked questions
What’s the difference between a pipeline and an opportunity in GoHighLevel?
A pipeline is the visual board of stages a deal moves through. An opportunity is a single deal or lead on that board, tied to a contact with its own value, stage and owner.
Can I create multiple pipelines in GoHighLevel?
Yes. Each sub-account supports unlimited pipelines and stages. Use separate pipelines for genuinely different processes, such as sales versus client onboarding.
Does GoHighLevel automatically add Won and Lost stages?
Yes. GoHighLevel handles Won and Lost outcomes for every pipeline, so you don’t need to create those stages yourself. Keep your custom stages focused on the steps between first contact and closing.
Can opportunities be created automatically in GoHighLevel?
Yes. In a workflow you can add a Create or Update Opportunity action so new form submissions, bookings, or funnel steps drop straight into the pipeline and stage you choose, with no manual entry.
Do I need a paid plan to set up pipelines in GoHighLevel?
No. Pipelines and opportunities are available during the free trial, so you can build and test your whole sales board before paying for a month.
Ready to put this to work?
Set up your pipeline, then let GoHighLevel run the follow-ups for you.
Related next step
Next: explore more GoHighLevel guides, start your GoHighLevel 30-day free trial, or browse the tools I actually use.