GoHighLevel’s CRM is where every customer and lead in a sub-account lives: contacts, the fields you track about them, tags, tasks, deals and a full activity history. This tutorial walks through the setup in the order you will use it, with a home-services business as the example.
New to GoHighLevel? Our link gives you a 30-day free trial instead of the usual 14 days, so you can follow every step in your own account.
- Before you start
- Import contacts
- Add a contact manually
- Create custom fields
- Organize contacts with tags
- Build a smart list with filters
- Add notes and tasks
- Track deals in a pipeline
- Review the contact timeline
- FAQ
GoHighLevel deal
Extended 30-day free trial (the standard is 14 days), plus the free GHL Launch Vault (20 bonuses, including a client-ready sales kit).
Before you start
- A GoHighLevel account (the 30-day trial works).
- Work inside a business sub-account, not the agency view. The CRM lives at sub-account level.
- Your contact list as a CSV file, or your HubSpot login, if you are moving existing contacts in.
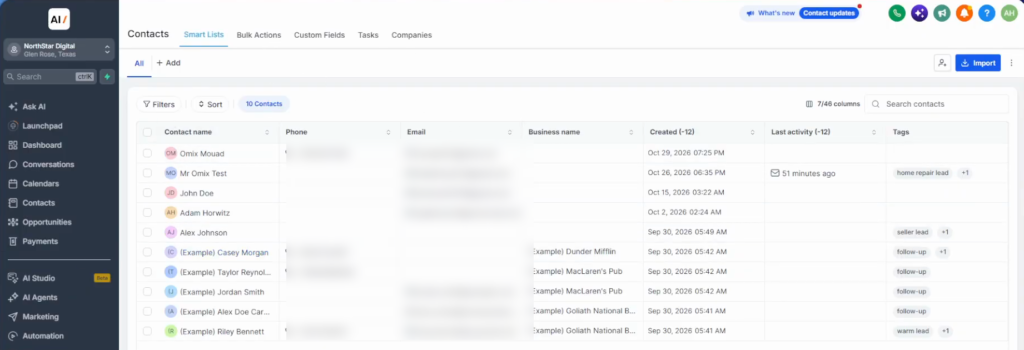
In the sub-account, click Contacts in the left menu. You land on Smart Lists, where your customer records are stored: search contacts, open their profiles and filter them from here.
Import contacts
Click Import at the top right. You get two options: import from a CSV file (upload, map fields, review and import) or import from HubSpot (connect your account and bring in records, custom fields and associations).
- Choose CSV and pick what you are importing. Contacts is the main option; opportunities and companies appear where available.
- Upload your file and choose the mode: create and update contacts, create only, or update only (useful after you have edited the CSV).
- Map your columns to GoHighLevel fields, verify the data and import.
- Check Import history to confirm it ran.
For HubSpot, connect and log in to your HubSpot account, then choose what to import. Imported contacts appear in your smart list, ready to organize. You can also export contacts from the same screen.
Add a contact manually
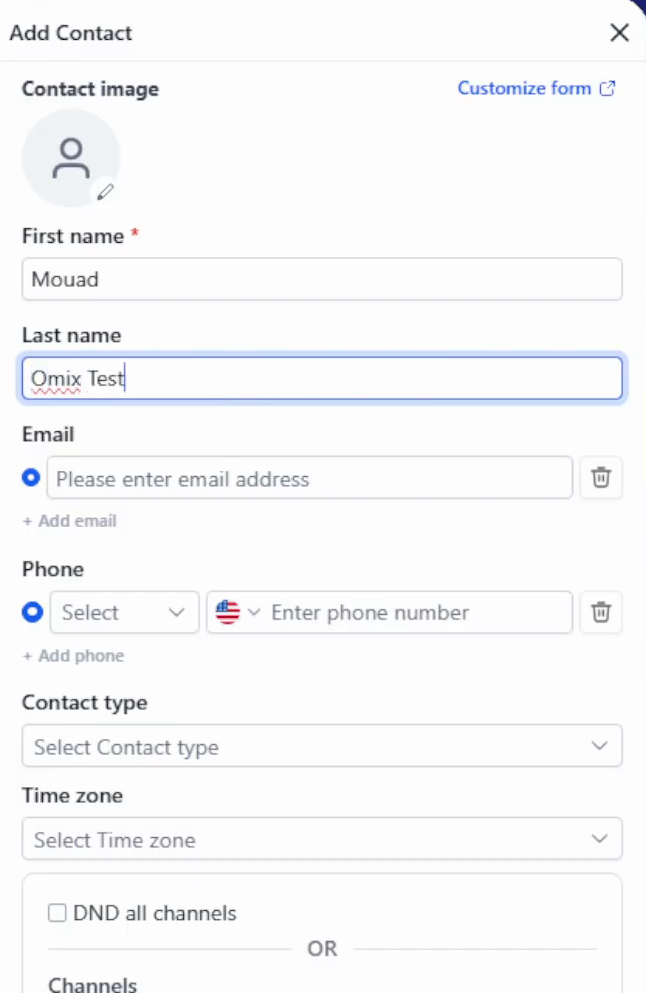
Click Add contact, next to Import. Enter the first and last name, email and phone number (choose the number type, such as mobile), then click Save. The contact appears in your smart list; if it does not show straight away, give it up to a minute. Contacts created by forms can take a moment to appear too.
Create custom fields
Custom fields store the details your business needs that GoHighLevel does not track by default. A home-services company, for example, might want to record which service each customer needs.
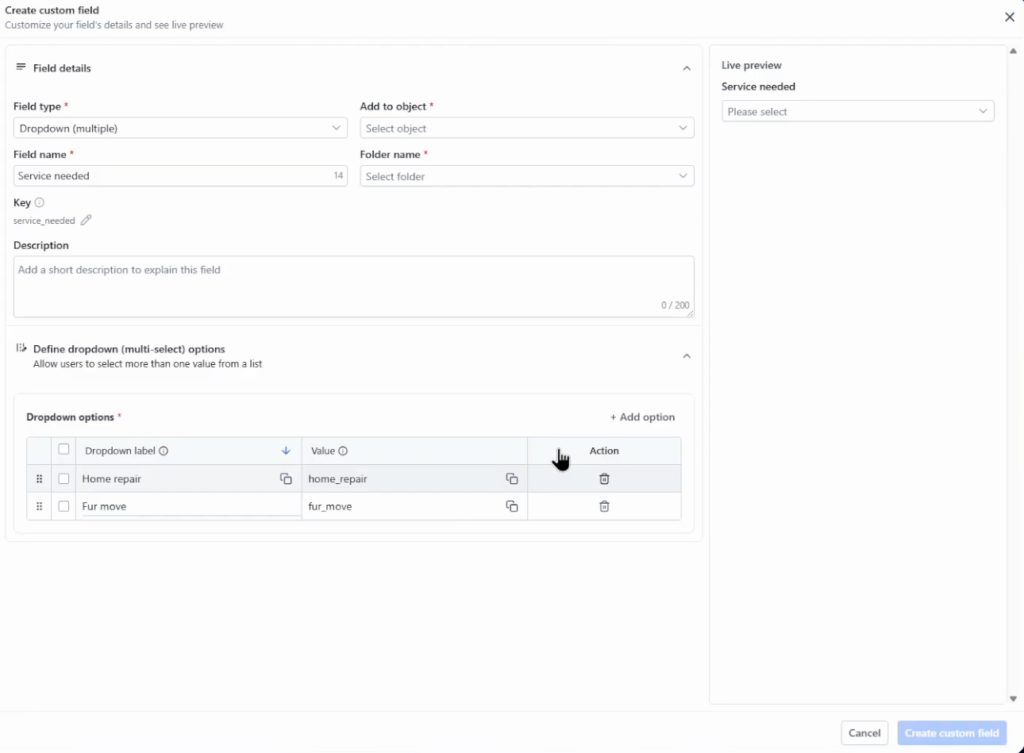
- Go to Settings → Custom Fields and click Create field.
- Choose a field type. For a list of services, pick Dropdown (single) or Dropdown (multiple).
- Name the field (for example, Service needed) and add the options: home repair, furniture assembly, installation.
- Choose the object it belongs to (contact, opportunity or company) and a folder, then click Create custom field.
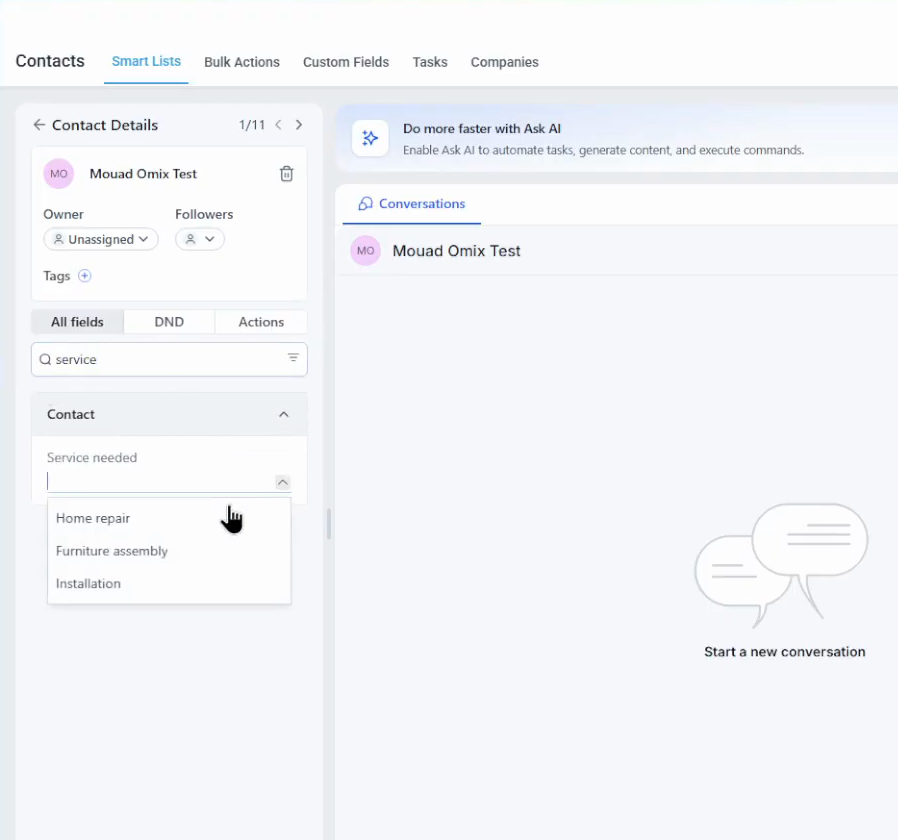
Back in Contacts, open a contact, find the field under All fields (search for it if needed) and pick the value. Now you can see at a glance what each customer is interested in. If GoHighLevel says a field with that name already exists, rename yours or delete the old one.
Organize contacts with tags
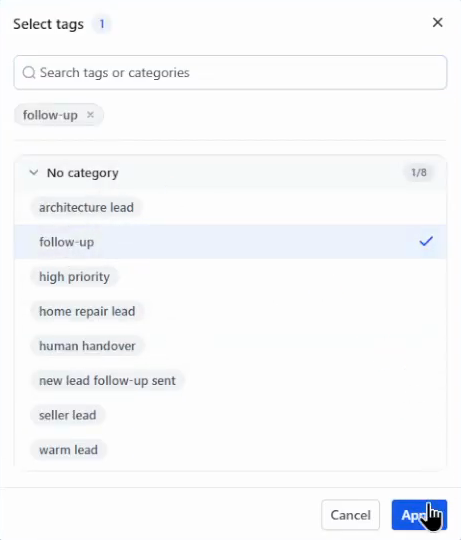
Tags are the quickest way to group contacts. Open a contact, click the + next to Tags, pick one or more and click Apply. Remove a tag the same way. Tags such as follow-up or home repair lead make it easy to spot customers who have not booked yet, and they are what smart lists and automations filter on.
Build a smart list with filters
On Smart Lists, click + Add to create a new list, then open Filters. Add a filter (for example, age between 20 and 25, a tag, or your custom field) and click Apply. A smart list is a saved filter, so you can come back to the same group of contacts any time.
Add notes and tasks
Inside a contact, use the right-hand panel to add a note, such as the details of the repair a customer needs, and give it a name you will recognize later. Switch to Tasks to create a follow-up, assign it to yourself or a team member and get a reminder. This matters most when you are handling several customers at once.
Track deals in a pipeline
A pipeline shows each deal moving through your sales stages. To create one, go to Opportunities → Pipelines, click Create pipeline, name it and add your stages, for example New Lead, Contacted, Appointment booked, Quote sent, Won and Lost.
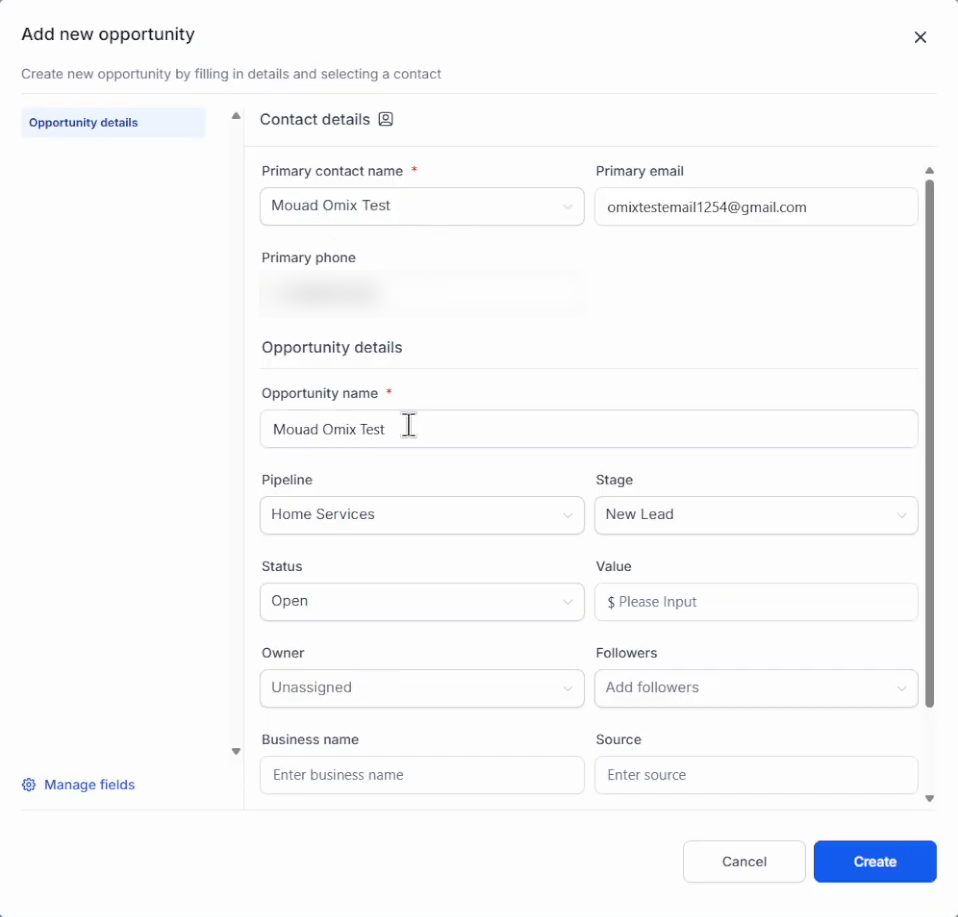
Then open Opportunities, select the pipeline and click Add opportunity. Pick the contact, name the opportunity (for example, Home repair), choose the pipeline and stage, set the status and add a value so the pipeline tracks revenue. Click Create.
Move the card from stage to stage as the job progresses, from new lead through to won.
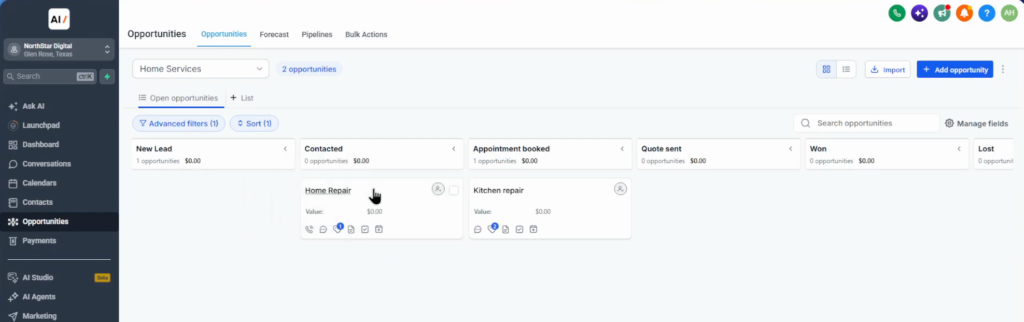
For a deeper walkthrough, see how to set up pipelines and opportunities in GoHighLevel.
Review the contact timeline
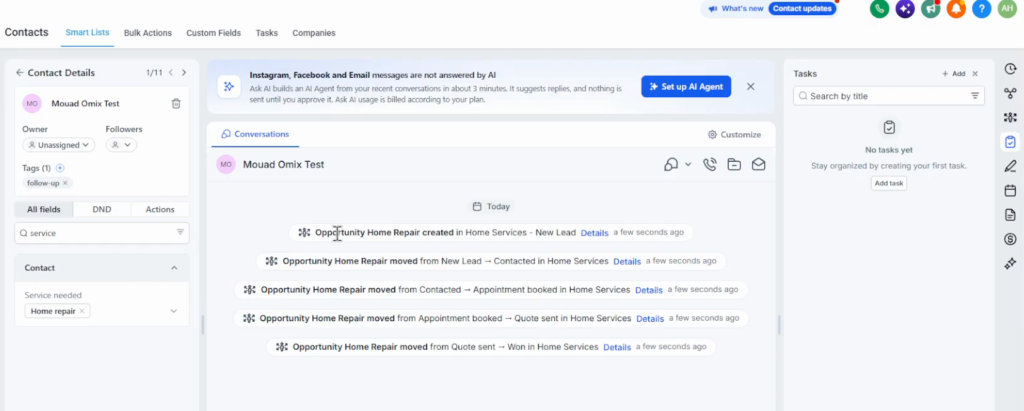
Open any contact to see its whole record in one place: conversations, notes, tasks, appointments, tags, custom fields and every opportunity change. In the example below, each stage move of the home repair job is logged with a timestamp. If SMS or email is set up, you can message the contact from the same screen, and those messages show up here too.
What I would set up first
If you are starting from zero, I would do it in this order: one custom field for what each customer wants, a handful of tags you will actually use, then one pipeline that matches how your jobs really move. Smart lists, tasks and automations all build on those three.
Keep field and tag names consistent from day one. Renaming later is easy, but the same thing tagged two different ways quietly breaks your smart lists and automations.
Common mistakes
- Working in the agency view instead of a sub-account, where the CRM actually lives.
- Expecting new contacts to appear instantly. Allow up to a minute, including for form submissions.
- Creating a custom field with a name that already exists. Rename it or delete the old field.
- Skipping the opportunity value, so the pipeline cannot show what deals are worth.
Frequently asked questions
Is GoHighLevel a CRM?
Yes. Every sub-account includes a CRM for contacts, custom fields, tags, smart lists, tasks, pipelines and opportunities, alongside GoHighLevel’s funnels, automations and messaging.
How do I import contacts into GoHighLevel?
Go to Contacts, click Import and choose a CSV file or HubSpot. For a CSV, upload the file, choose whether to create or update contacts, map the fields and import.
Can I import contacts from HubSpot?
Yes. Choose HubSpot in the import screen, log in to connect your account, then import records, custom fields and associations.
What is a smart list in GoHighLevel?
A saved, filtered view of your contacts, for example everyone with a certain tag or custom field value.
Why don’t new contacts show up straight away?
New contacts, including ones created by forms, can take up to about a minute to appear in the smart list. Refresh after a moment.
How long is the GoHighLevel free trial?
The standard trial is 14 days. Through our link you get 30 days, plus the free GHL Launch Vault.
Try GoHighLevel free for 30 days
Double the standard 14-day trial, plus the free GHL Launch Vault (20 bonuses).
Related next step
Next, set up pipelines and opportunities in depth, build a funnel in GoHighLevel, or see the full 30-day trial offer. More guides on the GoHighLevel hub.